Pruning
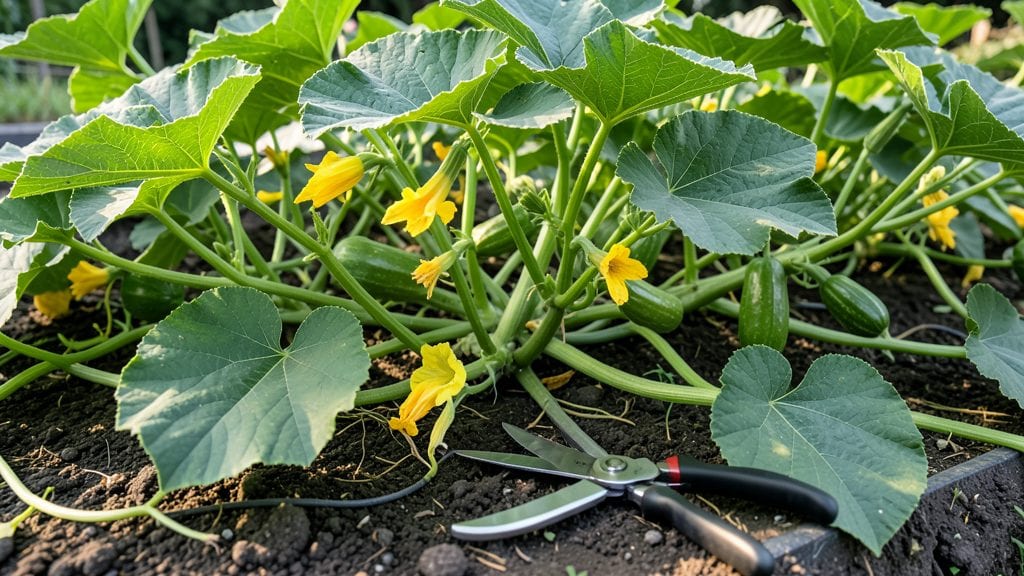
Pruning summer squash plants isn't just about keeping them tidy—it's the secret to doubling your harvest. 🌱 I learned this the hard way after my first overgrown bush produced just three sad-looking zucchinis while my neighbor's pruned plants yielded enough for a farmers' market stand.
The key lies in three strategic cuts that redirect energy from wild vines to fruit production.
The right tools and timing make all the difference. You'll need sharp pruning shears, a clean towel for wiping blades between cuts, and a sunny morning when the plants are dry. Focus on removing any vines with yellowing leaves or signs of disease first—these are the sneaky yield-killers.
Then target the three main trims: the first just above a leaf with three nodes, the second to open up the center for airflow, and the third to balance growth between male and female flowers.
What you'll end up with is a bush that produces consistently—not just a few giant squash followed by nothing. The plants stay compact, fruit ripens faster, and you avoid the frustrating cycle of overgrowth followed by sudden collapse.
My pruned plants now give me 20-30 pounds of squash per season instead of struggling with just a handful.
This method works for both bush and vining varieties, though bush types need slightly less aggressive pruning. The payoff comes in the middle of summer when your neighbors are still waiting for their first harvest while yours keeps coming. Ready to transform that sprawling mess into a productive powerhouse?
📚 In This Guide
- What you need
- Instructions
- Tips and common mistakes
- Wrapping up and next steps
What you need
- ● Pruning shears or sharp garden scissors – Choose bypass pruners (not anvil-type) for clean cuts. Look for 5-inch blades for precision.
- ● Rubbing alcohol (70% or higher) or a disinfectant – A small bottle (4 oz) to sterilize tools between cuts and prevent disease spread.
- ○ Gloves (optional but recommended) – Heavy-duty gardening gloves to protect against thorns (on some varieties) and blisters.
- ● Compost bin or bucket – A 5-gallon capacity to collect pruned vines and leaves for composting.
- ● Water spray bottle (8 oz) – For rinsing tools and hydrating plants post-pruning.
- ● Plant marker or labels – To track pruned sections if you’re experimenting with different techniques.
- ● Mulch (straw or shredded leaves) – A 2-inch layer to protect soil and retain moisture after pruning.
- ● Hand lens or magnifying glass – For spotting pests or diseases on leaves before pruning.
- ● Pruning saw (for thick stems) – Only needed if your squash vines grow unusually woody (rare for summer squash).
Step-by-Step guide to pruning summer squash plants
Here’s how to shape your squash plants for bigger harvests—no fancy tools needed.
✂️ Step 1: Remove Suckers Early for Stronger Growth
Start by inspecting the base of each main vine where leaves meet the stem. Look for small, weak shoots growing between the main stem and fruit—these are suckers. They drain energy from your squash, so pinch them off with your fingers or clean pruners when they’re less than 2 inches tall. I check weekly after the first flowers appear because suckers grow fast.
Focus on the first 12–18 inches of the main vine. The lower suckers are the biggest yield-drainers, so remove them first. If you miss a sucker, it’ll compete with your fruit for nutrients, leaving your squash smaller and fewer. Think of this as redirecting energy to the plants’ main priority: producing those big, sweet squash.
🌿 Step 2: Thin Overcrowded Vines for Better Airflow
Once your plants start flowering, some vines will grow too close together, blocking sunlight and airflow. Use your fingers or pruners to trim back any vines that tangle with others, leaving only the healthiest 2–3 vines per plant. You’ll know you’ve got the right balance when sunlight reaches the center of the plant and you can see new leaves unfurling.
Don’t cut too aggressively—just enough to open up the plant. I like to leave a few extra leaves at each cut to protect the stem from sunburn. If you’re growing 4 plants, focus on the outermost vines first. This keeps the center of the plant strong while still letting light in. Overcrowded centers lead to mold and fewer fruits, so this step is worth the extra few minutes.
✂️ Step 3: Trim Damaged or Diseased Leaves Immediately
Inspect your plants every 3–4 days during peak growing season for yellowing, spotted, or wilted leaves. These are red flags for pests or disease. Snip them off at the base with clean pruners, and don’t leave stubs—cut all the way to the stem. I’ve found that removing just a few diseased leaves early can save the whole plant from collapse.
Pay extra attention to the lower leaves near the soil, as they’re most vulnerable to rot and pests. If you see powdery mildew (white fuzzy spots), trim those leaves first and spray the rest with a neem oil solution (if available). Healthy leaves keep producing, so don’t hesitate—act fast. The goal is to keep your plant’s energy focused on fruit, not fighting off stress.
🌱 Step 4: Encourage Fruit Production by Pruning Old Flowers
After your squash plants flower, some blooms won’t turn into fruit. Look for flowers that stay closed or wilt without forming squash—these are energy wasters. Gently twist them off by hand or snip them at the stem. I do this once a week during peak bloom to push more energy toward developing squash.
Focus on the older flowers first, as they’ve had the longest to set fruit. If you’re harvesting 4–6 squash per plant, you’re on track—any more than that, and the plant gets overwhelmed. Pruning these spent blooms also improves airflow, reducing the risk of fungal issues. It’s a small effort that pays off with bigger, healthier squash.
Tips & tricks for pruning summer squash plants
Here's what nobody tells you about pruning summer squash plants that'll make all the difference in your harvest.
Timing is Everything: The weekly check after the first flowers appear is critical because suckers grow aggressively once they start. I've seen plants go from having no suckers to being completely overrun in just five days. Focus on those first 12-18 inches of vine where the lower suckers form—they're the biggest yield thieves. Don't wait until they're bigger than 2 inches tall to remove them, or they'll start competing with your fruit for nutrients.
Visual Cues for Better Pruning: When thinning overcrowded vines in Step 2, look for sunlight reaching the center of the plant as your guide. If you can see new leaves unfurling in the middle, you've got the right balance. I also check for sunlight patterns on the soil—if shadows stay in one spot all day, that's where you need to trim back vines. This simple visual check prevents overcrowding that leads to mold and fewer fruits.
Disease Prevention Strategy: The 3-4 day inspection routine in Step 3 is your best defense against powdery mildew and other fungal diseases. I've found that removing just a few diseased leaves early can prevent the entire plant from collapsing. Pay special attention to the lower leaves near the soil—they're most vulnerable to rot. If you spot white fuzzy spots (powdery mildew), trim those leaves immediately and consider a neem oil solution for the rest of the plant. Healthy leaves mean more energy for fruit production.
Flower Management Secret: When pruning old flowers in Step 4, focus on the older blooms first—they've had the longest time to potentially set fruit without success. I've noticed that plants with 4-6 squash per plant are typically the most productive. If you're harvesting more than that, you might be overloading the plant. The once-weekly pruning of spent blooms also improves airflow, which is crucial for preventing fungal issues that can ruin your harvest.
Pro Tips for Prune Summer Squash Plants
- Here's what nobody tells you about pruning summer squash plants that'll make all the difference in your harvest.
- Timing is Everything: The weekly check after the first flowers appear is critical because suckers grow aggressively o...
- Visual Cues for Better Pruning: When thinning overcrowded vines in Step 2, look for sunlight reaching the center of t...
Frequently asked questions
about pruning summer squash plants—because even the greenest thumbs need a little guidance! Here are answers to the most common queries to help you grow like a pro.When is the best time to prune summer squash?
Prune summer squash early and often—typically when plants reach 12–18 inches tall and throughout the growing season. Focus on removing suckers (side shoots) and yellowing leaves before they drain energy from the main plant. Morning pruning minimizes stress, and avoid trimming after heavy rain to prevent disease entry.
Do I really need to prune summer squash? Won’t it reduce my harvest?
Not at all! Pruning actually boosts yield by directing energy to fruit production. Overgrown plants with too many leaves or suckers produce smaller, fewer squash. Think of it like giving your plant a haircut—less clutter = more focus on growing those delicious zucchinis! Start pruning when you see 3–5 true leaves and 1–2 female flowers.
What if I skip pruning? What are the risks?
Skipping pruning can lead to overcrowded vines, which compete for sunlight and nutrients, stunting growth. You might also see fewer but larger squash (which can be bitter or tough). Worse, dense foliage traps moisture, inviting powdery mildew or pests. Pruning improves airflow and keeps your plants healthy and productive!
Can I prune summer squash the same way as winter squash?
Nope! Summer squash (like zucchini) are vining plants that benefit from aggressive pruning to encourage fruit production. Winter squash (e.g., butternut), however, are bushier and often pruned less aggressively to focus on fewer, larger fruits. Summer squash thrive with frequent trimming, while winter squash may need minimal pruning to avoid overcrowding.
My squash plant looks sad after pruning. Did I do it wrong?
Don’t panic! A little shock is normal, but if your plant looks severely stressed (wilted, yellowing, or dropping leaves), you may have over-pruned. Stick to removing no more than 1/3 of the foliage at once and avoid cutting into the main stem. Focus on suckers, dead leaves, and overcrowded branches—your plant will bounce back with proper care (and maybe a drink of water!).
Pro Tip:
Use sterilized pruners (wipe with rubbing alcohol) to prevent spreading disease. Prune on dry, sunny days so wounds heal faster. And if you’re unsure whether a shoot is a sucker or a future fruit-bearing branch, leave it be—better safe than sorry!
Wrapping up and next steps
Pruning your summer squash plants might feel like a small task, but it’s a game-changer for bigger harvests and healthier vines! 🌱 By focusing on removing suckers, trimming yellowing leaves, and pruning overcrowded stems, you’re setting your garden up for success.
With the right tools and timing, you’ll enjoy a bounty of fresh, flavorful squash all season long.
Ready to put your new skills to work? Grab your pruners and head to the garden—your future harvest is waiting! Pro tip: Keep an eye on your plants weekly to stay ahead of overgrowth. Happy pruning! ✂️